
Connecting a Definitive Technology subwoofer can upgrade your home theater setup. With the right techniques, you’ll enhance your sound experience dramatically. This guide will help both audio experts and beginners alike.
A well-connected subwoofer adds deep, rich bass to movies, music, and games. It brings your audio to life in ways you’ve never experienced before. Our guide will ensure you achieve optimal sound performance.
This discussion overlaps with atlas overview, especially for readers comparing connect definitive subwoofer with similar issues.
Proper subwoofer setup involves more than just plugging in cables. You need to understand your equipment and choose the right connection method. Fine-tuning settings to match your room’s acoustics is also crucial.
This guide offers clear instructions for seamless subwoofer connection. It’s perfect for first-time installers and those upgrading their systems. Get ready to immerse yourself in an incredible audio experience.
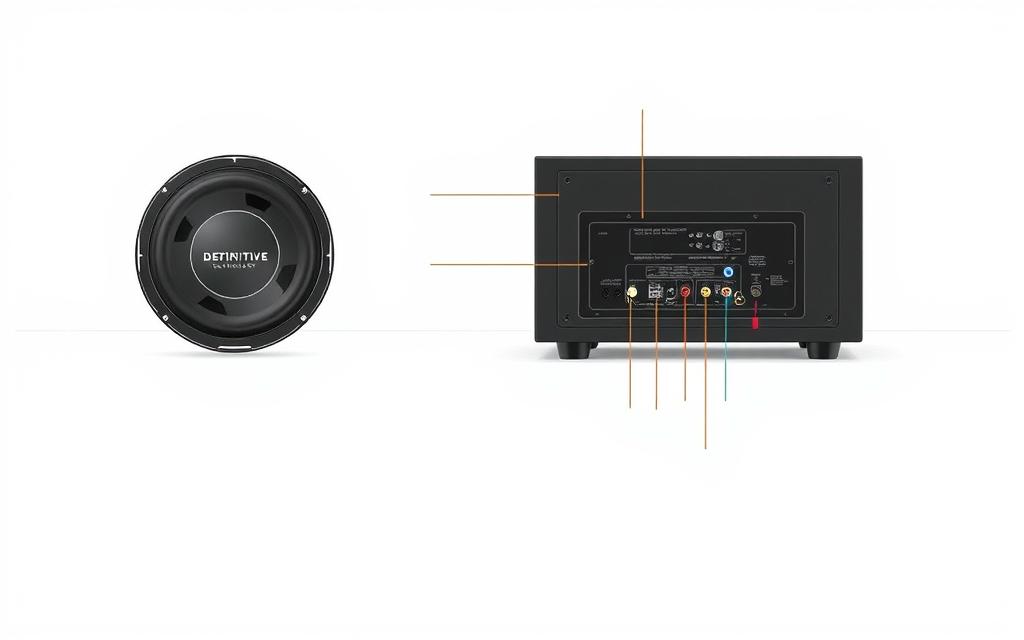
Understanding Your Definitive Technology Subwoofer Components
Definitive Technology subwoofer components are marvels of audio engineering. The Descend DN15 subwoofer showcases precise audio design. It offers a user-friendly system with various inputs and control features.
Key Input and Output Ports
Subwoofer ports are crucial for audio connectivity. Definitive Technology subwoofer components typically include:
- LFE (Low-Frequency Effects) input
- RCA line-level inputs
- Speaker-level binding posts
- Digital and analog input options
Power Requirements and Specifications
| Specification | Details |
|---|---|
| Power Output | 500 watts RMS |
| Voltage | 110-240V AC |
| Frequency Response | 20-200 Hz |
Control Panel Features
The control panel allows for precise audio customization. Users can expect intuitive controls including:
- Crossover frequency adjustment
- Phase control dial
- Volume level management
- Power on/standby switch
Related Posts:


Knowing these subwoofer specs helps achieve optimal audio performance. This knowledge benefits both music lovers and home theater fans.
Required Tools and Cables for Subwoofer Installation
Installing a Definitive Technology subwoofer needs specific tools and audio cables. Good preparation ensures a smooth setup process. Gather the right equipment for a seamless installation.
- Wire strippers
- Screwdriver set (Phillips and flathead)
- Measuring tape
- Cable tester
- Multimeter
Choosing the right audio cables is key for great sound. Different connections need specific cables. Check the table below for guidance.
| Cable Type | Connection Method | Recommended Length |
|---|---|---|
| RCA Cable | Line-level connection | 3-6 feet |
| XLR Cable | Professional audio systems | 6-15 feet |
| Speaker Wire | Speaker-level connection | 12-20 feet |
Pro tip: Always choose high-quality, shielded cables to minimize interference and maintain signal integrity.
Invest in reliable, professional-grade equipment for your subwoofer installation. Good wire strippers and cable testers prevent connection issues. They ensure a clean, secure setup for your subwoofer.
How to Connect Definitive Technology Subwoofer to Your System
Connecting your Definitive Technology subwoofer correctly is vital for great sound. Different methods suit various audio setups and equipment configurations. Your choice depends on your system’s needs and available inputs.

To get the best sound, know the three main subwoofer connection options. Each has its strengths for different setups.
LFE Connection Method
LFE is the simplest way to connect modern home theater systems. It provides a direct digital signal from your AV receiver.
- Locate the LFE input on your subwoofer
- Use a single RCA cable for connection
- Ensure the cable is securely connected
- Select LFE input on your subwoofer’s control panel
Line Level Connection Option
Line level connections work well for stereo systems without a subwoofer output. This method uses standard RCA inputs for various audio setups.
- Identify left and right line inputs on the subwoofer
- Connect RCA cables from receiver’s pre-out ports
- Verify signal transmission
- Adjust volume levels for balanced sound
Speaker Level Connection Setup
Speaker level connections suit older audio equipment or complex sound systems. This method uses standard speaker wire to connect the subwoofer directly.
- Locate speaker-level inputs on the subwoofer
- Connect speaker wire from amplifier outputs
- Match positive and negative terminals carefully
- Configure crossover settings manually
Pro tip: Always consult your Definitive Technology subwoofer’s manual for specific connection guidelines and recommended settings.
Optimal Placement and Room Acoustics
Subwoofer placement and room acoustics are crucial for the best sound quality. The right spot can greatly improve bass response and overall audio performance.
Here are some key strategies to optimize your listening experience:
- Avoid placing the subwoofer in corners, which can create boomy, undefined bass
- Experiment with positions near front wall or close to main speakers
- Use the “subwoofer crawl” method to find optimal bass response
Room acoustics significantly impact subwoofer performance and sound quality. Size, shape, and furniture arrangement affect bass reproduction. Hard surfaces reflect sound waves, while soft materials absorb them.
“Sound is 50% speaker performance and 50% room interaction” – Audio Engineering Professionals
Try these room acoustic techniques to minimize challenges:
- Add bass traps in room corners
- Use area rugs to reduce sound reflections
- Position subwoofer away from parallel walls
Smart subwoofer placement and room acoustic management ensure rich, balanced low-frequency sound. This approach enhances your entire audio system for an immersive listening experience.
Configuring Your AV Receiver Settings
Optimizing AV receiver settings for subwoofers is vital for great sound quality. The right setup can transform your listening experience. It ensures deep, precise bass that complements your main speakers.
Proper AV receiver settings for subwoofers involve three key adjustments. These are crossover frequency, phase control, and volume level calibration.
Crossover Frequency Adjustment
Subwoofer crossover frequency is where low sounds shift from main speakers to the subwoofer. Most speakers work best between 80-120 Hz. This range serves as an ideal crossover point.
To set the crossover frequency:
- Check your main speakers’ specifications
- Set crossover frequency based on speaker performance
- Use AV receiver’s built-in crossover settings menu
- Start at 80 Hz and fine-tune for best sound
Phase Control Settings
Subwoofer phase control aligns bass waves with main speaker output. Misaligned phases can cause sound cancellation or muddiness. Most AV receivers offer 0-180 degree phase adjustments.
- Listen to bass-heavy music
- Switch between 0 and 180-degree settings
- Choose the position with fullest, most balanced sound
Volume Level Calibration
Subwoofer volume calibration prevents overwhelming or weak bass. Use these methods for precise adjustment:
- Utilize AV receiver’s automatic calibration system
- Use a sound pressure level (SPL) meter
- Adjust volume to blend seamlessly with main speakers
- Aim for balanced, non-boomy bass response
Pro tip: Make small, incremental adjustments and listen carefully after each change to achieve the best sound quality.
Troubleshooting Common Connection Issues
Subwoofer problems can be frustrating, but most have simple solutions. A few key steps can help fix your audio system’s performance.
Check the basic connection points first. Loose or wrong cable connections often cause subwoofer issues. Make sure all cables are secure and match the correct inputs.
Start with these basic checks. Look at power cables and RCA or speaker wires. Check receiver settings, volume, and crossover settings too.
- Inspect power cable connections
- Check RCA or speaker wire connections
- Ensure receiver settings are correct
- Verify volume and crossover settings
If there’s no sound, try these steps:
- Confirm power is connected and the subwoofer is turned on
- Test different audio sources
- Check receiver audio output settings
- Verify speaker configuration in receiver menu
Some issues might point to deeper problems. Ground loop hum or distorted bass could mean complex audio system challenges. These may need expert diagnosis.
| Problem | Potential Solution |
|---|---|
| No Sound | Recheck cable connections, verify receiver settings |
| Intermittent Audio | Test cables, inspect wire integrity |
| Distorted Bass | Adjust crossover frequency, check volume levels |
If basic fixes don’t work, contact Definitive Technology support. Their experts can help when standard methods fail to solve the problem.
Conclusion
Setting up a Definitive Technology subwoofer requires precision and care. Understand connection methods, optimal placement, and receiver configuration to improve your home theater bass. Follow our guide to unlock your sound system’s full potential.
Creating a harmonious audio environment goes beyond connecting cables. It’s about delivering deep, rich bass while maintaining clarity and balance. Experiment with crossover frequencies, phase settings, and room positioning for immersive sound.
Great sound requires ongoing refinement. Listen critically and make small adjustments. Trust your ears as you explore your subwoofer’s capabilities.
Your commitment will result in a dynamic, powerful home theater experience. Movies, music, and games will come alive with incredible depth and precision.
Apply these techniques to start your audio adventure today. Your Definitive Technology subwoofer is ready to deliver an exceptional sonic landscape.